Room Creation

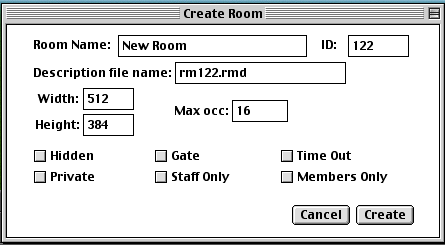
1 Room Name: This is the name of the room. The server will allow more than one room to have the same name with different graphic (not the same ID number).
2 ID: Do not fill this out. The server will assign it. If you demand a specific room ID number and it matches an existing room ID number it well not create the room.
3 Definition file name: Will be assigned by the server. If you wont to create a duplicate of a room, enter the existing description name. But all rooms will have their individual room ID numbers.
4 Width & Height: Are the desired room dimension, they can be changed in the room editor later.
5 Max Occ: Maximum Occupation in the room.
Room Characteristic Switches
6 Hidden: Will not show in the room list, except for members of groups with permission to see hidden rooms.
7 Gate: Where users will be sent on connecting. There can be more than one gate. Once a gate reaches maximum occupancy the sever will send users to the next gate on the list.
8 Time Out: When a lord, knight or other group with permission to use the sever command (‘timeout) while whispering to the client, that user will be transported to this room. The user will return to time-out upon connecting until the user is released.
9 Private: The name of the room will show up in the room list, but the number of occupants will not, a client in a private room will not show up in the user list.
10 Staff Only: Only users with appropriate permission and have authenticated will be allowed to enter.
11 Members Only: Will only allow users with current registration code to enter.
Room Editing

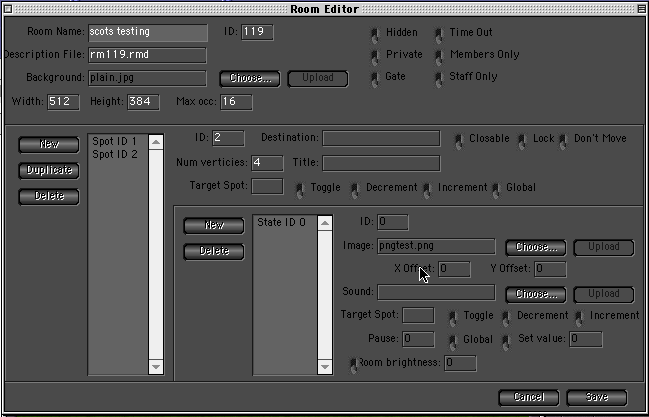
1 Room Name: This is the name of the room. The server will allow more than one room to have the same name with different graphic (not the same ID number).
2 ID: Is created when creating a room. Do not fill this out. The server will assign it. If you demand a specific room ID number and it matches an existing room ID number it well not create the room.
3 Definition File: Will be assigned by the server. If you want to create a duplicate of a room, you can enter the same Definition File name. If you wish to edit a room you will edit all rooms with the same Definition File name. To prevent this, change the Definition File name; be careful not to enter a preexisting Definition File name.
4 Background: Is the file you have chosen, (a PNG or JPG) to upload for your room backgrounds. Unix files are case sensitive, no spaces, and no special characters. It is a good idea to know what file you want and where it is located before going to the next step. If you take too long to find your file the server will kick you off.
5 Choose: Choose the background file name from your files with Choose. It is a good idea to know what file you want and where it is located before this step. If you take too long to find your file the server will kick you off.
6 Upload: This button will upload a PNG or JPG from your computer to the server. This will only need to be done once as long as you use the same file name the server will have it ready for duplicate room backgrounds.
7 Width & Height: Are the desired room dimensions.
8 Max Occ: Maximum user in the room.
Room Characteristics Switches
Were set in the Create Room and can be changed in Edit Room.
1 Hidden: Will not show in the room list, except for members of groups with permission to see hidden rooms.
2 Gate: Where users will be sent on connecting. There can be more than one gate. Once a gate reaches maximum occupancy the sever will send users to the next gate on the list.
3 Time Out: When a lord, knight or other group with permission to use the sever command (‘timeout) while whispering to the client, that user will be transported to this room. The user will return to time-out upon connecting until the user is released.
4 Private: The name of the room will show up in the room list, but the number of occupants will not, a client in a private room will not show up in the user list.
4 Staff Only: Only users with appropriate permission and have authenticated will be allowed to enter.
5 Members Only: Will only allow users with current registration code to enter.
Spots
This is used to add an element to the room (doorway, small image, link, etc..)
1 New: Create a new spot.
2 Duplicate: After making a spot you may wish to duplicate it,
3 Delete: Everyone makes mistakes, (If at first you don’t succeed destroy all evidence you tried)
4 ID: Each spot needs a number all Spot’s are assigned one. You may change this to a number from 0-65535
5 Destination: This can be a previous room ID number, a URL, or left blank.
6 Num. Vertices: Are line end points in the Spot frame polygon. No less than 3 and limited to 50 line end points. You can drag each point separately or the whole frame to position it.
7 Title: Optional text to be displayed on the spot.
8 Target Spot: Is the spot ID number, you want to be affected by the selected actions.
Spot Characteristics Switches
1 Closable: Means that it is a door spot, when closed by a user it can’t be entered. (Closed meaning the spot state is defined as being non-zero)
2 Lock: Means it is a lock Spot, when locked by a user the room can’t be enter.
3 Don’t Move: Means if the user clicks on the spot the client won’t move to that spot.
Spot Action Switches
1 Toggle: Flips the state from Zero to its maximum spot state and back again. If you wanted an image to switch on or off. Set the Target Spot number to its own Spot ID # and each time the user clicks in the spot it will invert the spot state.
2 Decrement: Subtracts one from the spot state.
3 Increment: Adds one to the spot state.
4 Global: Means the spot state is changed for everyone in the room.
States
Where you add images and sounds to be displayed or played, when a Spot enters that state.
1 New: Add a State.
2 Delete: To remove an unwanted State. (If at first you don’t succeed destroy all evidence you tried)
3 ID: A number from 0-65535. The State numbers should be done sequential.
4 Image: Is the file you have chosen, ( a PNG or JPG) to upload for your state image. If the state image is to be an animated image, each animation must have a separate state. Animation State ID numbers should start with 0. Unix files are case sensitive, no spaces, and no special characters. What file you want and where it is located before going to the next step. If you take too long to find your file the server will kick you off.
5 Choose: Choose the state image file name from your files with Choose. It is a good idea to know what file you want and where it is located before this step. If you take too long to find your file the server will kick you off.
6 Upload: This button will upload your PNG or JPG from your computer to the server. This will only need to be done once as long as you use the same file name the server will have it ready for duplicate state images.
7 X Offset: How far to move the image from calculated center, side to side.
8 Y Offset: How far to move the image from calculated center, up and down.
9 Sound: Is the file name you have chosen, (wave) to upload for your state sound. Unix files are case sensitive, no spaces, and no special characters. It is a good idea to know what file you want and where it is located before going to the next step. If you take too long to find your file the server will kick you off.
10 Choose: Choose the wave sound file from your files with Choose. It is a good idea to know what file you want and where it is located before this step. If you take too long to find your file the server will kick you off.
11 Upload: This button will upload your wave sound file from your computer to the server. This will only need to be done once as long as you use the same file name the server will have it ready for duplicate state sounds.
12 Target Spot: Is the spot ID number, you want to be affected by the selected actions.
13 Pause: Set time between actions.
State Action Switch
Action to be taken upon entering the state.
1 Toggle: Flips the spot from Zero to its maximum spot state and back again. If you want an image to switch on or off. Set the Target spot number to its own Spot ID # and each time the user clicks in the state it will invert the spot state.
2 Decrement: Subtracts one from the spot state.
3 Increment: Adds one to the spot state.
4 Global: Means that when this spot is used by the user everyone in the room sees it.
5 Set Value: Sets the value of the target spot to a specific value.
6 Room Brightness: Light percentage.
Cancel: Exit the editor with out saving. You will still see your changes until you reenter the room.
Save: Save the changes.

